Artisan Sourdough Bread Recipe
Baking sourdough bread is a rewarding process that combines simple ingredients, time, and technique to create something truly special. There’s nothing quite like the aroma of this Artisan Sourdough Bread Recipe filling your kitchen or the satisfaction of slicing into a crisp, golden crust. Whether you’re new to sourdough or looking to refine your skills, this guide covers every step. Let’s dive into the hands-on world of homemade sourdough and elevate your baking game!
Quick note: This site contains affiliate links. If you make a purchase, I may earn a small commission (so I can keep cooking and sharing even more recipes!). But only the products I’ve actually tested and love make the cut.
Ingredients for Artisan Sourdough Bread
Flour, Water, Salt
I love the beautiful simplicity of sourdough bread. Just three humble ingredients, flour, salt, and water, work together to create a wholesome, nourishing loaf that’s greater than the sum of its parts. It’s a process that feels both grounding and timeless, a true testament to the art of baking.
Sourdough Starter
Sourdough starter, which is just water and flour, is what makes the simple ingredients of flour water and salt come to life. If you don’t have a sourdough starter, make sure you check out my guide for everything you need to know about making and maintaining a sourdough starter.

Tools and Equipment
Kitchen Scale
As you probably know, a kitchen scale is going to be your BEST FRIEND when baking with sourdough (or baking in general!) If you haven’t had consistent results in the past, then buying a kitchen scale like this one will be a life changer.
Bread Scraper
This is what I use to make my large cuts for the wings and the legs. They make fancier ones that I may try out one day, but this thing is going strong 5 years in and I love it!
Bread Lame
A bread lame is essential for the beautiful designs and also making sure the bread doesn’t crack and ruin your design in the oven.
Dutch Oven
I am a huge fan of Lodge cast iron, but use whatever you have on hand! I have used enameled with success as well.
Key Techniques in Artisan Sourdough Bread Baking
Watching your dough more than the clock
This might be the most important advice you’ll ever receive when baking sourdough bread. Most recipes, including this one, include timeframes for you to follow. Please take these times as suggestions, and nothing more. It is so important to read your dough because each individual kitchen and oven is so different.
How long to autolyse sourdough?
Combining flour and water before adding the sourdough starter or salt allows the dough’s natural enzymes to work their magic. This step helps develop gluten, making the dough smoother and easier to handle. This recipe requires an hour-long autolyse due to the use of whole wheat flour.
Dough Strengthening Techniques
Building strength in your dough is essential for achieving that lofty, airy crumb with an open structure. This process is a series of gentle yet effective techniques to develop gluten and create structure over time.
Stretch and Fold
The stretch-and-fold technique adds layers of strength and incorporates air into the dough.
- Grab one edge of the dough with wet hands, lift it up gently, and fold it over the center.
- Rotate the bowl 90° and repeat until all four sides are folded.
- Perform this 3–4 times at 30-minute intervals.
Coil Folds for Extra Strength
Adding coil folds is optional but I do it for two reasons when my schedule allows. First, coil folds help to gently develop the gluten without damaging it, and it adds extra air to the dough, helping create a beautiful crumb. Second, I love playing with my souroudgh, its like adult playdough. Putting my hands in the dough is so enjoyable, and this is how I do it without damaging the dough.
How long to bulk ferment sourdough at room temp
During this stage, the dough doubles in size as the wild yeast ferments and strengthens the dough. Bulk fermentation is where the bread develops much of its structure and rich flavor.
You are looking for a puffy dough with visible bubbles on the surface and edges. When you gently poke the dough it should spring back slowly, leaving a slight dent.
Pre-shaping Sourdough
Pre-shaping is a key step that ensures proper tension in the dough and prepares it for final shaping. It’s often overlooked but makes a noticeable difference in the final loaf.
Steps for Pre-shaping:
- After bulk fermentation, turn the dough out onto a lightly floured surface.
- Use a bench scraper to divide it into two equal portions (or keep it whole for one large loaf).
- Gently shape each portion into a loose round by tucking the edges under and creating a smooth surface.
- Let the dough rest uncovered for 20–30 minutes.
Shaping Your Artisan Sourdough Bread
Shaping involves forming your loaf into its final shape (boule or bâtard) while creating surface tension to hold its structure during baking.
Cold Proofing
Cold-proofing allows for extended fermentation, leading to a more complex flavor, more bioavailable nutrients and easier handling when scoring. Place your shaped loaves in flour-dusted proofing baskets and refrigerate for 12–15 hours.
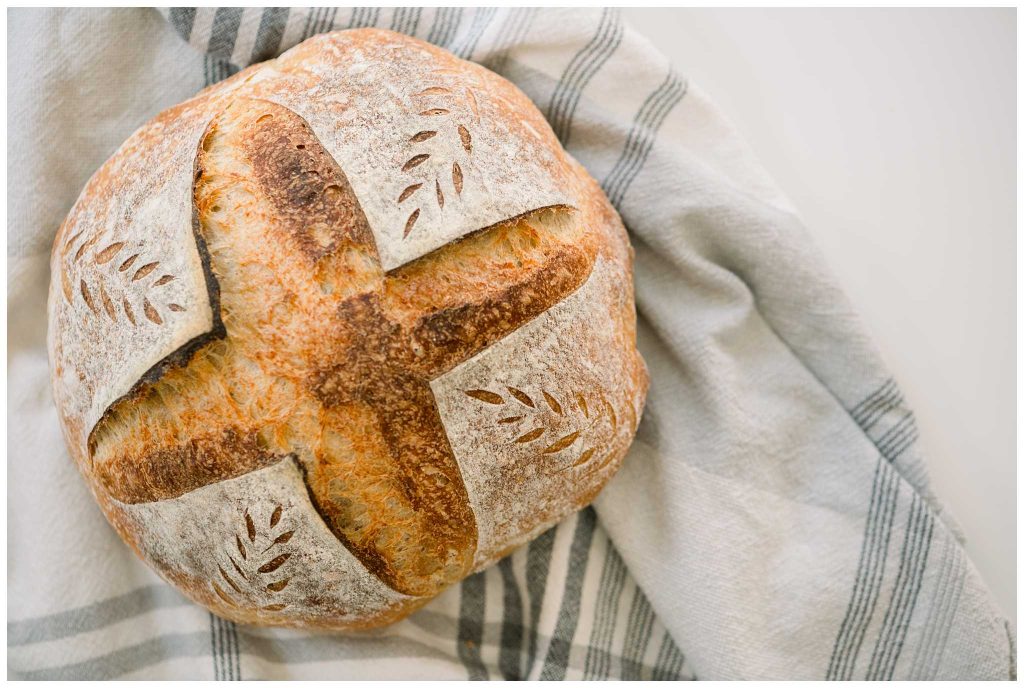
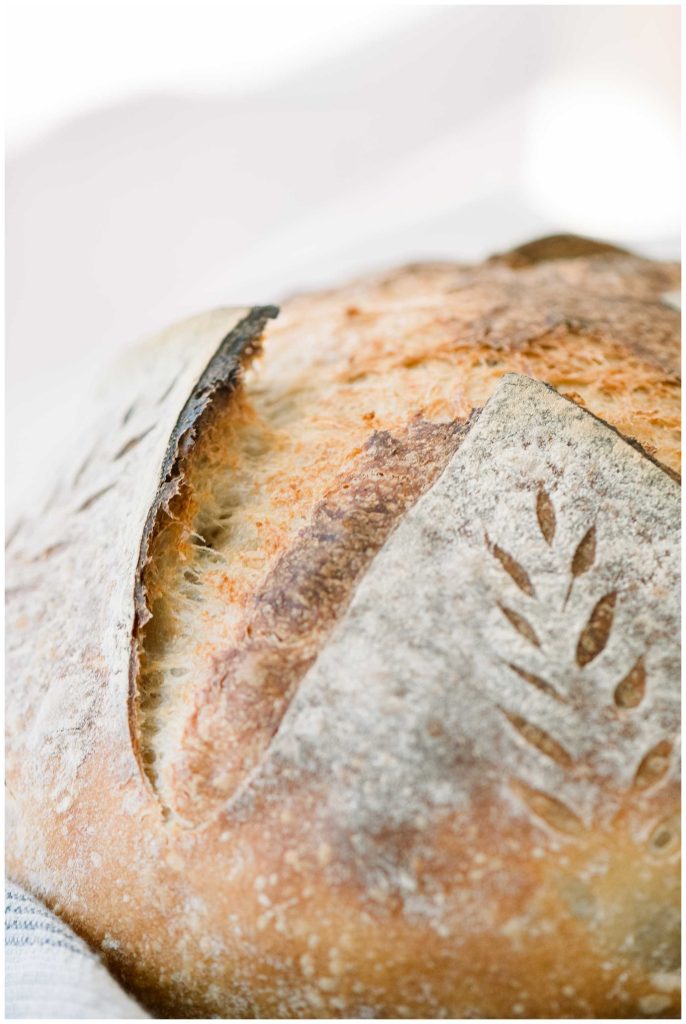
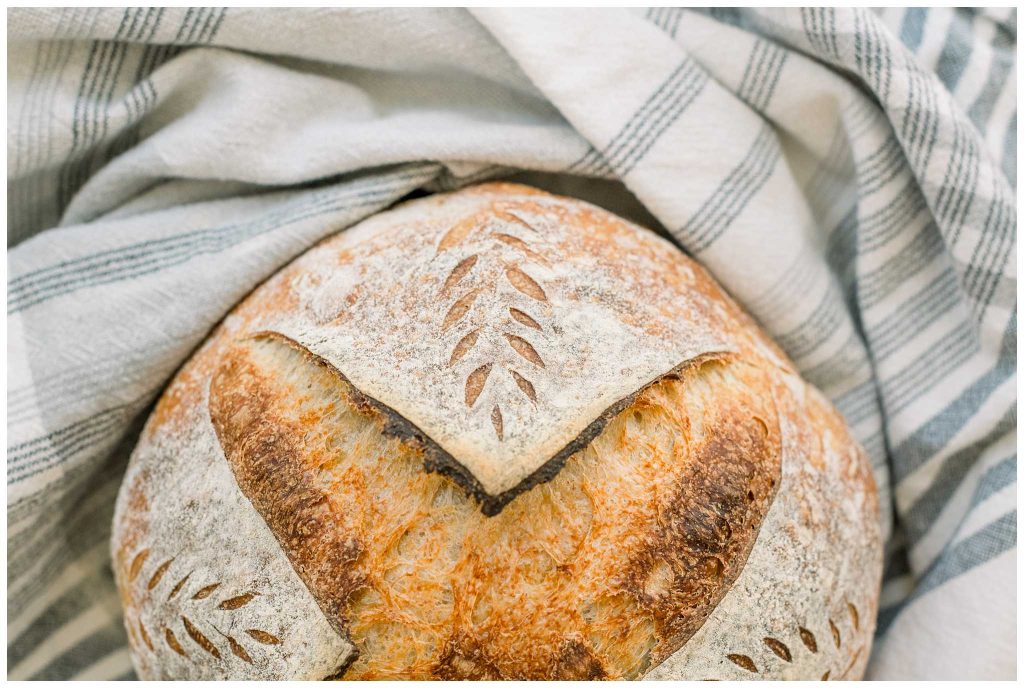
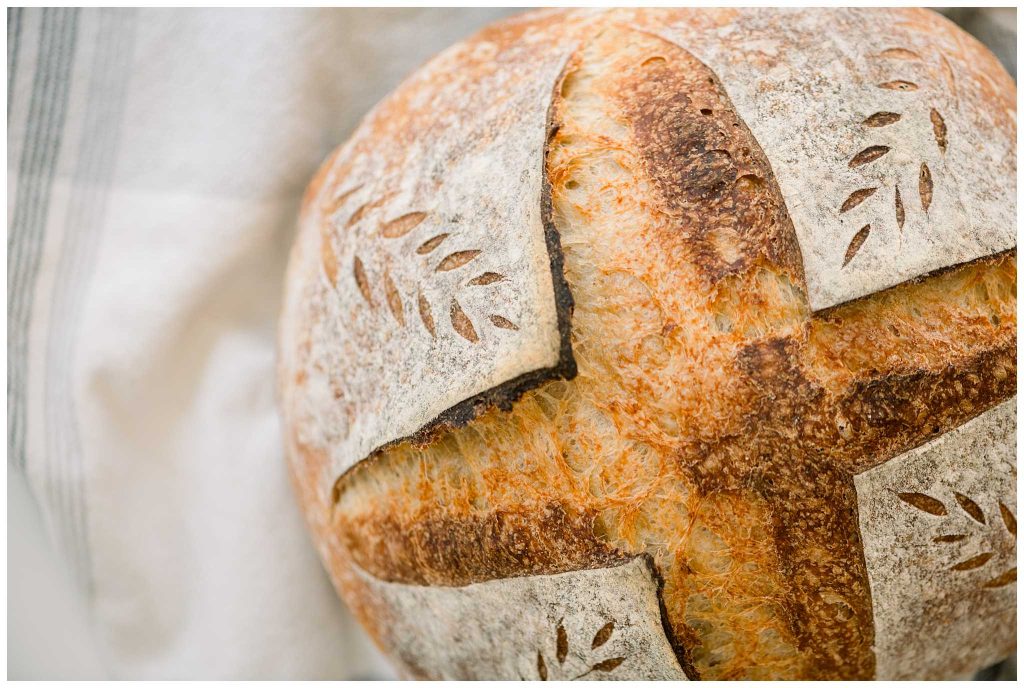
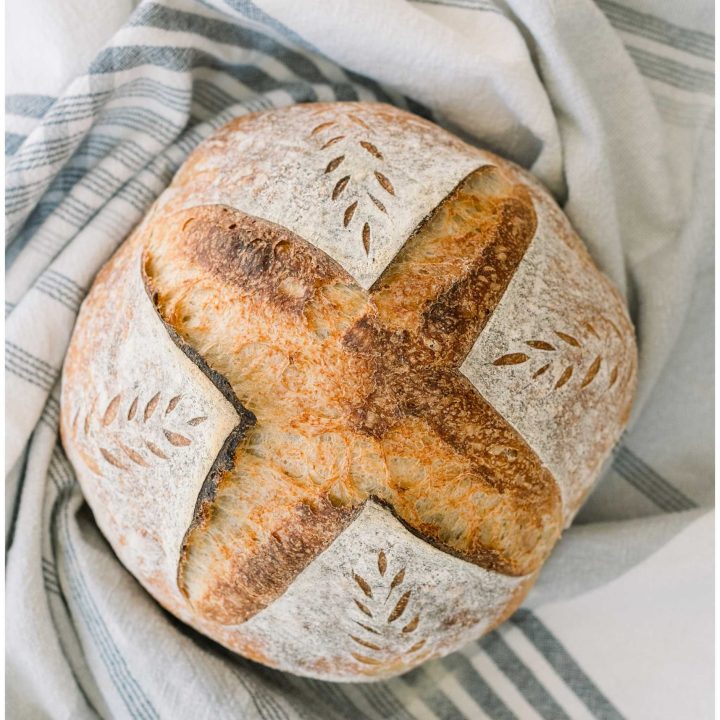
Scoring Artisan Sourdough Bread
Scoring directs the bread’s expansion in the oven, preventing uncontrolled ruptures. It’s also where bakers can unleash their artistic flair. Make sure to check out my library of scoring tutorials to give you step-by-step direction and inspiration
Baking Sourdough In Dutch Oven
Trapping steam in the oven during the first part of baking helps the crust stay elastic while the loaf rises. This is easily done with a dutch oven. The liquid from the dough is trapped in the lidded dutch oven and creates a perfect environment for your artisan sourdough bread. If you want to learn how to make sourdough bread without a dutch oven (which is called open baking) check out this recipe.
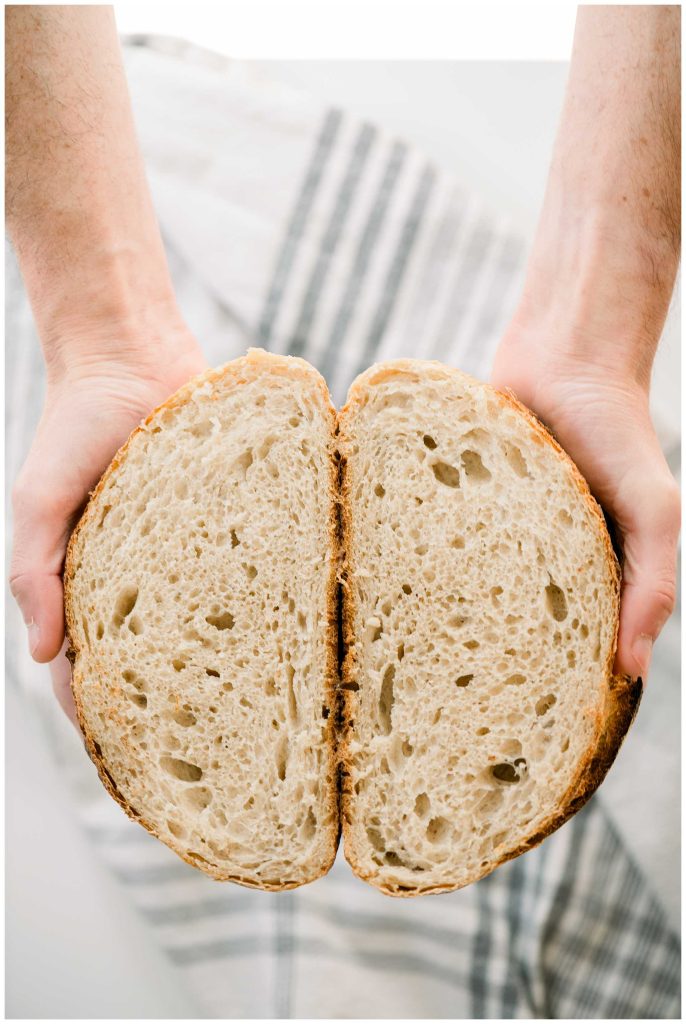
Cooling Sourdough Bread
Letting the bread cool completely allows the crumb to set properly and the full flavor to develop. Cutting too soon can make the crumb gummy, so allow at least 2 hours of cooling time on a wire rack.
Troubleshooting Common Sourdough Issues
Why is My Sourdough Bread Dense?
Dense bread is often a sign of underproofing, meaning the dough didn’t have enough time to ferment and develop gas. Check your bulk fermentation and proofing times—if the dough hasn’t risen significantly and lacks visible air bubbles, it needs more time. Temperature also plays a role; cooler environments slow fermentation. Using an active and bubbly sourdough starter is crucial for good results. If your starter isn’t at its peak, the bread may lack the rise and lightness you’re aiming for.
What to do with dense sourdough bread?
Don’t toss it! Dense sourdough makes excellent croutons, breadcrumbs, or even French toast. Slice and toast it for a chewy, satisfying snack or repurpose it in recipes like bread pudding. Sourdough’s tangy flavor means it can shine even when the texture isn’t perfect.
Why is my dough too sticky to handle?
Sticky dough is a common challenge, especially with high-hydration recipes. Ensure your measurements are accurate, as too much water can make the dough unmanageable. Wetter doughs will become less sticky with proper mixing, stretching, and folding as gluten develops. Wetting your hands or lightly oiling them helps prevent sticking during handling.
My dough didn’t rise, what happened?
A flat or unrisen dough usually means the starter wasn’t strong enough or the bulk fermentation was cut short. Test your starter before baking by floating a spoonful in water; if it sinks, it needs more time to ferment. If the ambient temperature is too low, try placing the dough in a warmer spot, such as a turned-off oven with the light on.
Why does my bread have large holes in some areas and none in others?
Irregular crumb structures often indicate uneven fermentation or inadequate dough shaping. Use stretch-and-fold or coil techniques to evenly distribute the gases created during bulk fermentation. When shaping, avoid knocking out all the air while still ensuring an even tension across the dough.
Why did my dough stick to the proofing basket?
Dough sticking to a basket is usually a sign of insufficient dusting. Use a mix of all-purpose and rice flour for dusting, as rice flour is less absorbent and creates a barrier to sticking. Don’t forget to dust the sides of your basket or towel evenly.
How to store Sourdough Bread
Sourdough stays freshest at room temperature for 1–2 days. Store it in a breathable environment like a paper bag, bread box, or wrapped in a clean kitchen towel. Avoid plastic bags unless you’re in a very dry climate, as they can trap moisture and make the crust soft. To maintain freshness, slice only as much as you need and leave the rest of the loaf whole.
How to freeze Artisan Sourdough Bread
To freeze sourdough, let the whole loaf cool completely, then wrap it tightly in plastic wrap or foil and place in a freezer-safe bag for up to 3 months. When ready to use, run the frozen loaf quickly under water, then warm it in a 350°F oven for about 20 minutes to restore freshness and a crisp crust.
Frequently Asked Questions
Can I Use All-Purpose Flour Only for Sourdough Bread?
Absolutely! You can use all-purpose flour to make sourdough bread, but keep in mind that it might not give you the same depth of flavor or hearty texture as adding some whole wheat or rye flour. If you’re going for that rustic farmhouse vibe, a mix of flours gives your bread a beautiful nuttiness. If all-purpose is all you have, though, don’t let that stop you—real bread is better than no bread. Just be ready for a softer crumb and slightly less structure in your dough.
How Do I Know if My Starter is Ready to Use?
A starter that’s ready to work its magic will be bubbly, airy, and smell like a tangy blend of fresh yeast and apples. It should double in size within 4–8 hours of feeding and pass the “float test”—a small spoonful of starter should float when dropped into water. If it sinks, don’t stress; give it a bit more time or another feeding. Remember, every starter is unique, just like a good sourdough loaf, so practice a little patience (and keep the coffee brewing).
Can I Skip the Autolyse Step?
Technically, yes, but hear me out. This one step can make all the difference. Autolyse lets the flour hydrate and enzymes do their thing, resulting in a dough that’s easier to work with and has better structure and flavor. Think of it like giving your dough a head start! If you’re in a rush, you can skip it, but when it comes to sourdough, a little extra time leads to next-level bread.
How Long Should I Proof My Sourdough Bread?
The final proof can vary depending on your kitchen’s temperature and humidity. At room temperature, proofing can take anywhere from 2 to 4 hours. For a more complex flavor (and let’s be honest, way less stress), try a cold proof in the fridge for 12–15 hours. It’s like tucking your dough in for the night, and in the morning, it’s ready to bake! Plus, cold dough is easier to score.
How long to take sourdough out of the fridge before baking?
Why Didn’t My Bread Rise in the Oven?
Oh no—flatbread? This could be due to under-proofing, over-proofing, or not getting enough steam in the oven. Under-proofed dough hasn’t developed enough gas, while over-proofed dough is exhausted and can’t spring up. Double-check your bulk fermentation and proofing times. And don’t skimp on the steam—pop that Dutch oven lid on tight for a steamy bake or use a tray of hot water at the bottom of the oven if you’re going lidless.
How Can I Fix Sticky Dough?
Sticky dough can feel like wrangling a wild animal, but don’t give up! Instead of adding tons of flour (which can mess with hydration), keep your hands and tools lightly floured or wet with water. Stickiness often gets better as the gluten develops—thank stretch-and-folds for that! Trust the process and remind yourself, “It’s rustic.”
Can I Bake Sourdough Bread Without a Dutch Oven?
You sure can! A Dutch oven creates a steamy, consistent environment, but it’s not the only way. Bake your loaf on a preheated pizza stone or baking steel, and place a few ice cubes on the bottom rack for steam. Rustic bakers of old made do with what they had, and so can we.

Baker’s Schedule for Artisan Sourdough Bread Recipe
7:00 AM – Feed Your Starter
- Feed your sourdough starter so it will be active, bubbly, and ready to go in about 4–6 hours.
- Place the starter in a warm spot in your kitchen (70–75°F is ideal).
10:30 AM – Begin Autolyse
- Mix 670 g all-purpose flour, 250 g whole wheat flour, and 715 g water in a large bowl until there are no dry bits.
- Cover the bowl and let the dough rest near your starter.
11:30 AM – Mix in Starter and Salt
- Add 200 g active sourdough starter and 17 g sea salt to the dough.
- Use wet hands to mix until fully incorporated.
12:00 PM – First Stretch and Fold
- Perform your first set of stretch-and-folds: gently stretch one side of the dough and fold it over, repeating on all four sides. Cover and let rest.
12:30 PM – Second Stretch and Fold
- Repeat the stretch-and-fold process to further strengthen the dough.
1:00 PM – Third Stretch and Fold
- Another round of stretch-and-folds. The dough should begin to look smooth and hold its shape better.
1:30 PM – Fourth Stretch and Fold (Optional: Add 2 Coil Folds After)
- Do the final stretch-and-folds. If you’d like more structure, add 1 or 2 coil folds every 30 minutes after this point.
2:30 PM – Bulk Fermentation
- Cover the bowl with a damp towel or loose lid and allow the dough to rise until it doubles in size. This depends on your kitchen temperature. In the summer is can usually take 2–3 hours, in the winter it can take up to 4 hours
4:00 PM – Divide and Shape
- Turn the dough out onto a clean work surface. Divide it into two equal pieces and shape each into a loose round.
- Let the dough rest, uncovered, for 35 minutes.
4:35 PM – Final Shaping and Proofing
- Shape your dough into boules or bâtards and place them seam-side up in proofing baskets lined with floured kitchen towels.
- Cover the baskets with reusable plastic bags or wrap and refrigerate for a cold proof overnight (12–15 hours).
Next Morning – Baking
7:00 AM – Preheat the Oven
- Preheat your oven to 450°F with a Dutch oven inside for at least 30 minutes.
7:30 AM – Bake the First Loaf
- Remove the first loaf from the fridge, flip it onto parchment paper, and score with a lame.
- Transfer to the preheated Dutch oven, cover, and bake for 20 minutes at 400°F. Then remove the lid and bake an additional 20–35 minutes until deep golden brown.
8:30 AM – Bake the Second Loaf
- Repeat the process with the second loaf.
10:00 AM – Cool and Slice
- Allow your artisan sourdough bread loaves to cool completely on a wire rack (about 1–2 hours) before slicing. Enjoy the rewards of your labor!
Artisan Sourdough Bread Recipe
Artisan Sourdough Bread
Ingredients
- 670 g all-purpose flour
- 250 g whole wheat flour
- 200 g 100% hydrated sourdough starter
- 715 g water
- 17 g sea salt
Instructions
Autolyse
- Feed your sourdough starter 4–12 hours before starting the bread, ensuring it’s active and bubbly.
- About 1 hour before the starter is at its peak, place the flour and water in a large bowl. Use wet hands to mix until no dry bits remain.
- Use a bowl scraper to scrape down the sides of the bowl, gathering the dough at the bottom. Cover and rest near your starter for 1 hour.
Mixing & Kneading
- After an hour, add your active sourdough starter and the salt to the dough.
- Use wet hands to mix until all ingredients are fully incorporated. Knead for about 5 minutes.
- The dough should begin to look smooth and hold its shape. If it’s still shaggy, continue mixing for another few minutes, but it’s okay if it doesn’t smooth out completely.
- Cover with plastic wrap or a damp towel and let it rest for 30 minutes.
Stretch and Fold
- Perform 4 sets of stretch-and-folds, spaced 30 minutes apart:
- Using wet hands, grab one side of the dough, lift it up, and fold it over to the opposite side.
- Rotate the bowl 180° and repeat. Rotate the bowl 90° and repeat on the third side. Rotate 180° again and complete the last fold.
- The dough should be neatly folded after each set. Cover the bowl and repeat every 30 minutes until all sets are done.
- (Optional) Perform 2 coil folds, spaced 30 minutes apart, after the stretch-and-folds for additional structure.
Bulk Fermentation
- Cover the bowl with plastic wrap, a damp towel, or a loose-fitting lid and let the dough bulk ferment until it doubles in size (typically 1 hour 30 minutes to 2 hours, depending on the temperature of your home).
Divide and Preshape
- After bulk fermentation, the dough will have risen significantly and should have bubbles on the surface and sides. It should look smoother and feel elastic and cohesive if gently pulled.
- Using a bowl scraper, gently scrape the dough onto a clean work surface.
- Divide the dough into two equal pieces with a bench knife.
- Shape each piece into a loose round and let them rest for 35 minutes, uncovered.
Shaping and Final Proof
- Line two proofing baskets or bowls with clean kitchen towels. Dust lightly and evenly with flour.
- Shape each piece of dough into a bâtard or boule and place them seam-side up into the prepared baskets.
- Place the baskets inside reusable plastic bags and seal. Cover and proof in the refrigerator for 12–15 hours.
Baking
- Place an oven rack in the bottom third of the oven and ensure no rack is above it. Preheat the oven to 450°F and place a Dutch oven inside to heat for 30 minutes.
- Remove one proofing basket from the fridge. Place a piece of parchment paper over the basket and flip the dough onto it.
- Lightly dust the dough with flour to enhance your scoring pattern. Use a bread lame to score the dough.
- Transfer the dough with the parchment paper into the preheated Dutch oven. Cover with the lid and bake for 20 minutes at 400°F.
- Remove the lid and continue baking for an additional 20–35 minutes until the crust is a deep golden brown.
- Repeat with the second loaf.
- Allow the bread to cool completely on a wire rack before slicing.
Notes
How to store Sourdough Bread
Sourdough stays freshest at room temperature for 1–2 days. Store it in a breathable environment like a paper bag, bread box, or wrapped in a clean kitchen towel. Avoid plastic bags unless you’re in a very dry climate, as they can trap moisture and make the crust soft. To maintain freshness, slice only as much as you need and leave the rest of the loaf whole.
How to freeze Sourdough Bread
To freeze sourdough, let the whole loaf cool completely, then wrap it tightly in plastic wrap or foil and place in a freezer-safe bag for up to 3 months. When ready to use, run the frozen loaf quickly under water, then warm it in a 350°F oven for about 20 minutes to restore freshness and a crisp crust.