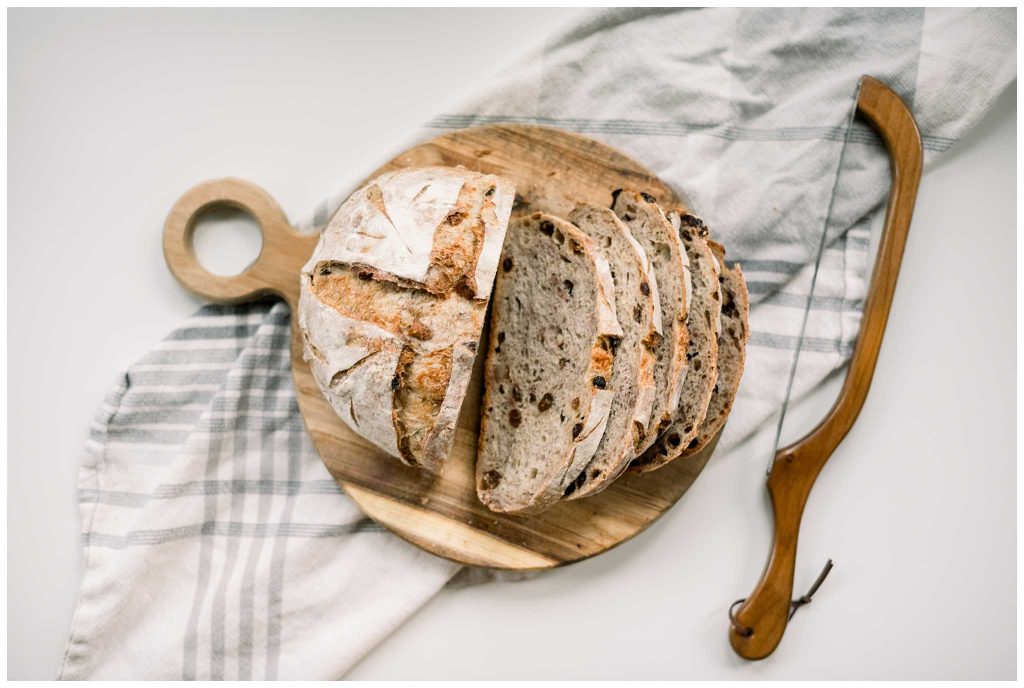
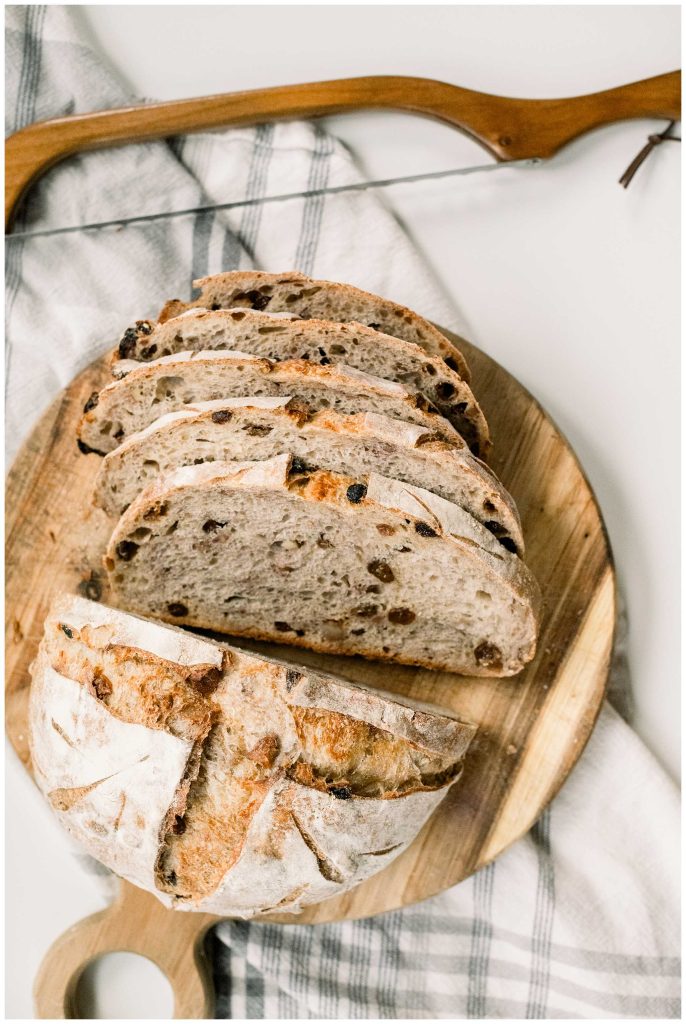
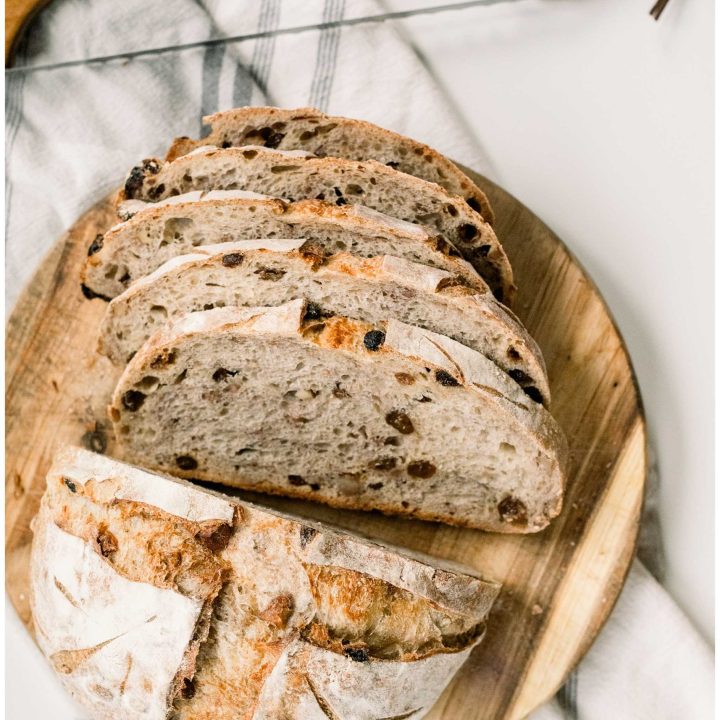
Walnut Raisin Sourdough Bread Recipe
Walnut Raisin Sourdough will always have such a special place in my heart because this delicious combo was the first time I tried adding inclusions to my bread. The second inclusion I tried was Jalapeno Cheddar, which was life-changing! But today, we are going to talk about the beautifully, lightly sweet, walnut raisin sourdough loaf.
Some links on this site are affiliate links. If you buy something, I may earn a small commission (aka more ingredients for future recipes!)
Why You’ll Love This Walnut Raisin Sourdough
Perfectly Balanced Flavor
The natural sweetness of raisins paired with the crunch of walnuts creates a the most amazing flavor combination. You can enjoy it toasted with butter, french toast, or a mid-afternoon snack with some cheese.
Beginner-Friendly Inclusions
If you’re new to adding inclusions to sourdough, this recipe is the perfect starting point. With clear instructions and foolproof techniques, you’ll feel confident folding in those flavorful extras. If you already have a sourdough recipe and technique that you love, then use this recipe as a guide! I love that sourdough is such a personal journey.
Ingredient List For Walnut Raisin Sourdough
Sourdough Starter
You’ll need 100 grams of active, bubbly sourdough starter. This will provide the rise and distinct tangy flavor that makes sourdough bread so special.
Water
Measure out 356 grams of water. This hydrates the dough perfectly, striking the right balance between pliability and structure.
Brown Sugar
Add 80 grams of brown sugar for a touch of sweetness that enhances the flavors of the raisins and walnuts.
All-Purpose Flour
This recipe uses a mix of both all-purpose flour and whole wheat flour. I love the deep color and added nutrition that whole wheat brings to sourdough, but feel free to omit the whole wheat and replace with all-purpose 100%.
Sea Salt
Weigh out 9 grams of sea salt. This essential ingredient elevates all the other flavors and helps strengthen the dough. Trust me when I say, you don’t want to leave out the salt.
Walnuts
Their nutty crunch adds texture and balances the sweetness of the raisins. Pecans are another great option for this sourdough bread!
Raisins
You’ll need 58 grams of raisins, hydrated in warm water. These plump gems provide just the right amount of natural sweetness. I used black raisins in this recipe, but I also love using golden raisins as well! If you’re feeling funky, you could even try craisins!

Tools and Equipment
Large Mixing Bowl
A large bowl will give your dough plenty of room to expand during fermentation.
Kitchen Scale
Precision is everything with sourdough baking, so a kitchen scale is a non-negotiable tool for accurate measurements. I know that weighing ingredients can seem daunting and intimidating for new bakers, but I promise it makes everything soooo much easier. And at how inexpensive and reliable ones like this one are, it’s just not something you should do without!
Bowl Scraper
A bowl scraper helps you cleanly gather every bit of dough, making mixing and folding much easier.
Proofing Basket
Use a proofing basket (or a bowl lined with a floured towel) to support the dough during the final rise.
Dutch Oven
A Dutch oven traps steam during baking, creating an ideal environment for a crispy crust.
Bread Lame
A bread lame or sharp razor blade is essential for scoring your loaf so it can expand beautifully in the oven.
Parchment Paper
Parchment paper helps transfer the dough into the Dutch oven without a mess and prevents sticking during baking. If you don’t like the waste that parchment paper makes, these silicone mats work really well too!
Step-by-Step Instructions
Autolyse
Start by feeding your sourdough starter 4–12 hours before you plan to bake, so it’s nice and bubbly when you’re ready to use it. About an hour before your starter is at its peak, mix the water and brown sugar in a large bowl until the sugar dissolves completely. Add the all-purpose and whole wheat flours, and use your wet hands to mix everything together until no dry bits of flour remain. Cover the bowl and let the dough rest for 1 hour. This step allows the flour to hydrate fully and starts developing gluten.
Mixing
After the autolyse, it’s time to bring your dough to life. Add the active sourdough starter and sea salt to the dough. Knead it by hand for about 5 minutes until everything is fully incorporated. Cover the bowl again and let it rest for 30 minutes to relax the dough. While the dough rests, soak the raisins in warm water. This prevents them from drawing moisture out of your dough later.
Stretch and Folds with Inclusions
Now for the fun part: building structure with stretch and folds while incorporating those delicious walnuts and raisins. Perform the first stretch and fold by grabbing one side of the dough with wet hands, lifting it up, and folding it over the opposite side. Rotate the bowl and repeat on all four sides. Cover the dough and let it rest for 30 minutes.
For the second stretch and fold, add the inclusions. Drain the soaked raisins and spread them evenly over the dough, along with the chopped walnuts. Gently press the inclusions into the dough as you stretch and fold again. This helps distribute them evenly throughout. Once folded, cover the dough and let it rest for another 15 minutes.
Coil Folds
To further strengthen the dough, perform three coil folds, spaced 15 minutes apart. With lightly wet hands, lift the dough from the center, allowing the sides to fold naturally underneath as you place it back into the bowl. Turn the bowl and repeat from the opposite side. Each fold adds elasticity and structure to the dough while ensuring even distribution of the inclusions.
Bulk Fermentation
After the final coil fold, cover the bowl and let the dough bulk ferment until it doubles in size. This can take about 2–4 hours, depending on the temperature of your kitchen. Look for a smooth surface with visible bubbles, signaling the dough is ready for shaping.
Preshape and Rest
Once bulk fermentation is complete, gently turn the dough out onto a clean work surface. Using a bench scraper, shape it into a loose round and let it rest for about 35 minutes, uncovered. This short rest allows the dough to develop a light skin, making it easier to shape later.
Shaping and Final Proof
Lightly dust a proofing basket or a bowl lined with a clean kitchen towel with flour. Shape the dough into your preferred shape—either a bâtard or a boule—and place it seam-side up into the basket. Cover the basket with a reusable plastic bag or wrap it tightly, then pop it into the fridge for a long, cold-proof of 12–15 hours. This slow fermentation deepens the flavor of your loaf.
Baking
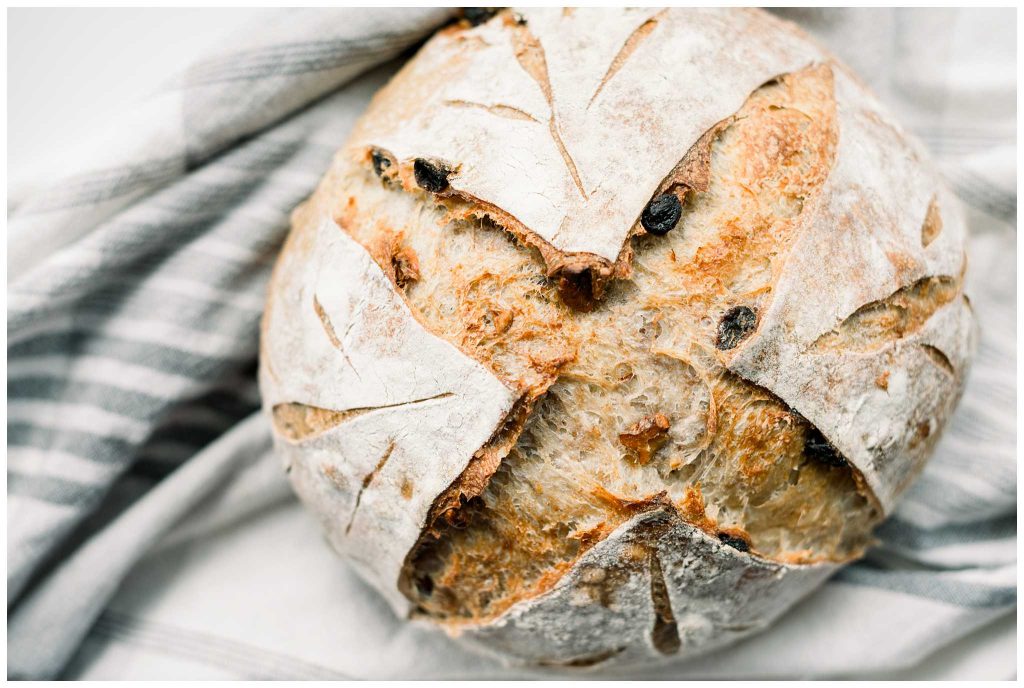
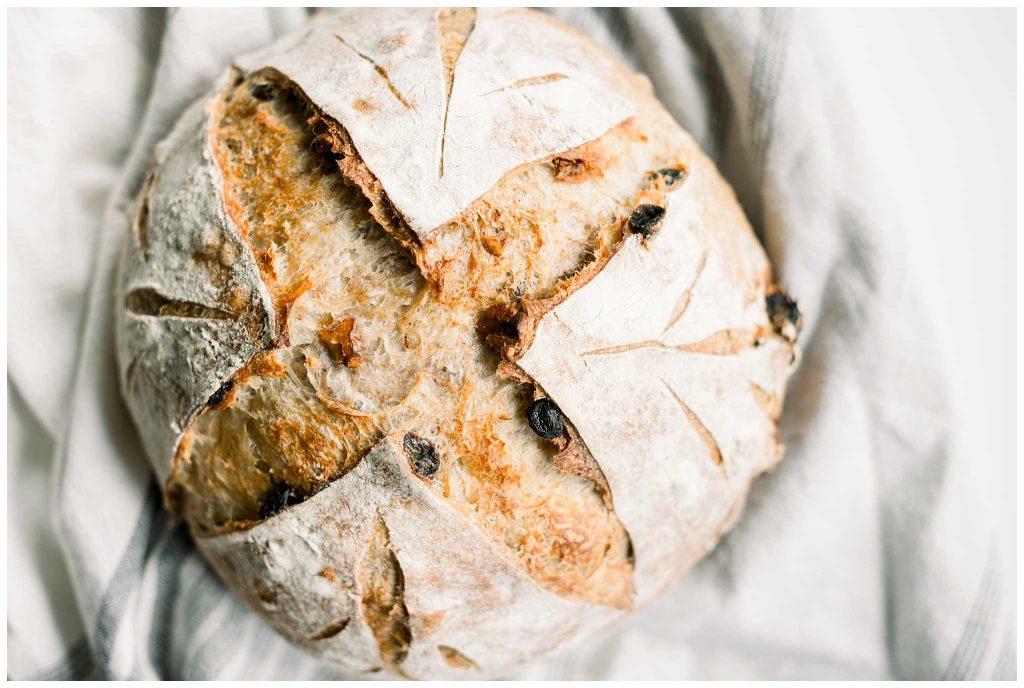
When you’re ready to bake, preheat your oven to 450°F. Place a Dutch oven on the bottom rack and heat it for at least 30 minutes to ensure it’s properly preheated. Take the proofed dough out of the fridge, flip it onto a sheet of parchment paper, and lightly dust the top with flour. Score the top with a bread lame to create your favorite design—this helps the bread expand as it bakes.
Carefully transfer the dough (on the parchment paper) into the hot Dutch oven, cover it with the lid, and bake for 40 minutes. Remove the lid for the last 10–15 minutes to develop a deep golden crust. Once baked, let the loaf cool completely on a wire rack before slicing into it. This resting time allows the crumb to set and the flavors to shine.
Tips and Tricks
Soaking Your Raisins
Baking Covered vs Uncovered
Walnut Raisin Sourdough Bread Recipe
Walnut Raisin Sourdough Bread
Walnut Raisin Sourdough Bread combines the sweetness of raisins with the crunch of walnuts this delicious loaf. This hearty bread is a delightful twist on classic sourdough.
Ingredients
- 100 g hydrated sourdough starter
- 356 g water
- 80 g brown sugar
- 335 g all-purpose flour
- 125 g whole wheat flour
- 9 g sea salt
- 58 g walnuts
- 58 g raisins
Instructions
Autolyse
- Feed your sourdough starter 4–12 hours before starting the bread, ensuring it’s active and bubbly.
- About 1 hour before the starter is at its peak, mix water and brown sugar in a large bowl until well combined, then add flour. Use wet hands to mix until no dry bits remain.
- Cover and rest for 1 hour.
Mixing
- After an hour, add your active sourdough starter and the salt to the dough, knead the dough for 5 minutes. Then cover and allow to rest for 30 minutes.
- Soak your raisins in warm water to hydrate them
Stretch and Fold (with Inclusions)
- Perform 2 sets of stretch-and-folds, spaced 15 minutes apart:
- First Stretch and Fold: Using wet hands, grab one side of the dough, lift it up, and fold it over to the opposite side. Rotate the bowl and repeat until all sides are folded. Cover and rest for 30 minutes.
- Before the second stretch-and-fold, add the inclusions: 58 g walnuts and 58 g raisins.
- To incorporate the inclusions: Spread them evenly over the dough's surface, then gently press them into the dough as you perform the second stretch-and-fold.
- Cover the bowl and let the dough rest for 15 minutes after the second fold.
Coil Folds
- After the stretch-and-folds, perform 3 coil folds, spaced 15 minutes apart. To do a coil fold, lightly wet your hands and lift the dough from the center with both hands. Allow the edges to naturally fold underneath as you place it back in the bowl. Turn the bowl and repeat from the opposite side.
Bulk Fermentation
- Cover the bowl with plastic wrap, a damp towel, or a loose-fitting lid and let the dough bulk ferment until it doubles in size.
Preshape
- After bulk fermentation, the dough will have risen significantly and should have bubbles on the surface and sides. It should look smoother and feel elastic and cohesive if gently pulled.
- Using a bowl scraper, gently scrape the dough onto a clean work surface. Shape it into a loose round ball and let it rest for 35 minutes, uncovered. This will give it a skin that will help with shaping and the final proof.
Shaping and Final Proof
- Line a proofing baskets or bowl with a clean kitchen towel. Dust lightly and evenly with flour.
- Shape the dough into a bâtard or boule, depending on your preference, and place it seam-side up into the prepared basket.
- Place the basket inside reusable plastic bags and seal. Cover and proof in the refrigerator for 12–15 hours.
Baking
- Place an oven rack in the bottom third of the oven and ensure no rack is above it. Preheat the oven to 450°F and place a Dutch oven inside to heat for 30 minutes.
- Remove the proofing basket from the fridge. Place a piece of parchment paper over the basket and flip the dough onto it.
- Lightly dust the dough with flour to enhance your scoring pattern. Use a bread lame to score the dough.
- Transfer the dough with the parchment paper into the preheated Dutch oven. Cover with the lid and bake, covered, for 40 minutes.
- Allow the bread to cool completely on a wire rack before slicing. Cooling ensures the crumb sets properly and enhances flavor.
Notes
To store your Walnut Raisin Sourdough Bread, allow it to cool completely before wrapping it in a clean kitchen towel. Store at room temperature for up to 3 days. If you need to keep it for a longer period, slice the bread and freeze the slices in a sealed bag or container for up to 3 months. To enjoy, simply toast the frozen slices or warm them in the oven.


I know you’re going to love this sourdough recipe! If you give it a try, let me know how it turns out. Have any questions? Drop them in the comments, and I’ll do my best to help!
I did love the outcome but the process was difficult due to the high hydration. I found it impossible to knead the dough. Did you mean stretch and fold , or use an electric mixer? The finished product was beautiful and very tasty. I added 1 teaspoon of cinnamon to the inclusions. But what about the hydration?
Hey Pietrina!
High hydration dough can have a learning curve but it is one of those “trust the process” things. Every time you make it it gets easier. I actually started baking sourdough with a low hydration dough, and it was a learning curve for me as well but my bread comes out amazing every time! I do not use a stand mixer in this recipe. I love your cinnamon addition! YUM!
Warmly,
Elly